
HOW-TO
How to Transport a Motorcycle Safely

To transport a motorcycle safely, you should follow these tips:
-Ensure that the motorcycle is properly secured.
-Ensure that the motorcycle is in good condition.
-Ensure that the rider is wearing protective gear.
-Make sure that the vehicle has enough fuel and oil.
-Make sure that the bike has its own protection from wind, rain, and dust.
What is the Best Way to Transport a Motorcycle?
The best way to transport a motorcycle is by using a scooter. Scooters are smaller and easier to carry. They also have more storage space for other items like helmets, jackets, and bike locks.
The main advantage of using a scooter instead of a car or truck is that it’s much cheaper to purchase and maintain. It will also be safer because you’ll have less weight to carry on your body.
Scooters are available in many styles and sizes so there’s one for everyone. If you’re looking for something that’s easy to transport, then the best option is a folding scooter which can easily be stored in your trunk or under the seat of an automobile.
What are the Different Ways to Transport a Scooter?
Scooters are a popular form of transportation, but they can be difficult to transport. They often require a motorcycle transport bag or motorcycle transportation case to keep them safe and secure.
There are many different ways to transport scooters. The most common way is by putting the scooter on top of the car, but this can be difficult if you have a small car. Another option is to put it in the trunk, but this may not be practical for people who have a lot of luggage with them.
Here are some other ways that you can consider:
-Put it in your trunk and cover it with blankets so that it doesn’t scratch your car’s paint job
-Put it on top of your bike rack and secure it with bungee cords
-Use the back seat
How to Transport a Scooter by Car
Carrying a scooter in the trunk of a car is not difficult, but it can be done with some preparation.
The first step is to make sure that your car has enough space for the scooter. Some cars can accommodate scooters while others need to be modified. The second step is to unpack the scooter and make sure that it will fit in the trunk without any difficulties. The third step is to determine where you are going to put the scooter when you get there and how you will transport it safely and securely in your car.
When transporting a scooter by car, same side driving may be more appropriate for safety reasons. Visit Shiply to know more about transporting a motorbike safely.
What are the Different Methods of Carrying a Motorcycle?
There are a lot of ways to carry a motorcycle. Some common methods are carrying it on your back, carrying it on your shoulder, and carrying it with a bag.
The most common method is to carry the bike with a bag. This is because you can pack the bike into the bag easily and store it in your trunk or luggage compartment of your car.
Carrying a bike with a bag is convenient for people who want to transport their motorcycle in their car or on public transport, but not for people who want to take their motorcycle off-road or for long distances.
Which Method Should I Use to Carry My Scooter on My Bike?
Scooter is a popular mode of transportation in the city. It can be used to get to work or school, or just for leisure. However, it is not always easy to carry your scooter on your bike.
There are two ways you can carry your scooter on your bike – with a rack or by using a carrier. The rack option is more secure but the carrier option allows you to keep the scooter close and out of harm’s way while riding.
The best way to decide which method you should use is by considering what type of bike you have and how much space it has for carrying other items with it.
What are the Different Ways of Carrying A Bike With a Bike Carrier?
Carrying a bike with a bike carrier is not an easy task. There are multiple ways of carrying it, and each method has its own pros and cons.
Which is the safest and easiest method for you to carry your bike?
There are four different methods of carrying a bike with a bike carrier:
1) On your back using straps (the most common)
2) By holding it by the handlebars (the most popular, but not always safe)
3) Using the frame as a handlebar-like device (this one is more difficult to use and can be hard on your back if you’re carrying more than one bike at once or trying to carry something else in addition to the bike)
4) Carrying it on top of your head like a backpack.

Brewing a perfect cup of espresso within your home’s comfort demands artistic expertise with scientific precision which involves selecting high-quality ingredients with meticulous care. This comprehensive guide presents nine crucial steps, guiding you to enhance your espresso-making powers from the initial selection of beans to the final, satisfying sip.
1. Choose Fresh and Quality Coffee Beans
The journey to the perfect espresso coffee starts with the selection of beans that are not only fresh but of the highest quality, ideally roasted within the past month to ensure maximum flavor and aroma. The type of bean you select plays a crucial role in the overall taste of your espresso, as different origins and roast levels bring their own unique profiles to the cup. Whether you’re drawn to the bright acidity of African beans or the rich, full-bodied flavors from South America, experimenting with various beans from around the world is key to finding the blend or single origin that matches your taste.
2. Calibrate Your Coffee Grinder
Achieving a uniform and consistent grind is essential for unlocking the full flavor of your coffee beans. To ensure this consistency, a burr grinder is indispensable, as it provides uniform grind particles, unlike the less precise blade grinders. The grind size should be similar to the texture of table salt. This specific fineness is vital for the optimal flow of water through the coffee at the right pace, extracting the rich flavors and aromas.
3. Measure Coffee and Tamp Correctly
For a standard shot, aim for 18–20 grams of coffee, a sweet spot that balances intensity and flavor. Equally important is the art of tamping: distribute the grounds evenly in the portafilter and apply firm, even pressure to tamp. Proper tamping prevents water from finding the path of least resistance and channeling through the coffee unevenly, which can lead to over-extracted or under-extracted areas. This attention to detail ensures each shot of espresso is balanced, rich, and full of the intended flavor nuances.
4. Preheat Your Espresso Machine
Preheating your espresso machine, portafilter, and cup helps in achieving temperature stability. This practice ensures that the coffee doesn’t suffer from sudden temperature drops during extraction, leading to a more consistent and flavorful shot. For those looking to elevate their home coffee experience further, investing in the best dual coffee maker can be a game-changer. This device offers the option to switch between brewing espresso and regular coffee. This versatility caters to a wider range of preferences, making it an ideal addition to any coffee lover’s kitchen collection.
5. Understand Your Machine’s Settings
Understanding your espresso machine’s settings is crucial for crafting a perfect cup of coffee. By adjusting the temperature, pressure, and volume, you can fine-tune the machine to achieve your desired flavor. This level of customization provides you with greater control over the extraction process, enabling you to brew each shot precisely to your taste preferences.
6. Time Your Shots
The timing of your espresso should be 25–30 seconds for a single shot, as this window typically yields the best balance of flavors. If your espresso is pouring too quickly or too slowly, it can indicate the need for adjustments in grind size, tamp pressure, or even the machine’s settings. By paying close attention to the timing, you can tweak your brewing process, ensuring each cup of espresso is as delicious as intended.
7. Froth Milk to Perfection
Start with cold, fresh milk for the best results, and steam it until it reaches the sweet spot of 140–150°F. This temperature range is ideal for creating microfoam with tiny, uniform bubbles, essential for the silky mouthfeel of a top-notch latte or cappuccino. Mastering milk frothing elevates your home barista skills, bringing a professional quality to your espresso creations.
8. Clean Your Equipment Regularly
Regular maintenance of your espresso machine and grinder is essential not only for the longevity of your equipment but also to prevent the buildup of coffee oils and mineral deposits, which can adversely affect flavor. Additionally, ensure your grinder is always free from old grounds, as stale grounds can compromise the taste of your espresso.
9. Experiment and Adjust
The art of espresso is personal and ever-evolving. Experiment with different beans, grind sizes, and brewing parameters. Take notes on what works and what doesn’t, and adjust your process to continuously refine your espresso shots.
Conclusion
Mastering the art of espresso at home is a rewarding journey that transforms each cup into a moment of pleasure. Whether savoring the rich intensity of a solo shot or the smooth complexity of a milk-infused creation, by following these steps, you embrace both the meticulous nature and the creative freedom of espresso making.

Making changes to your house once in a while or often is both quite common. Home renovation is part of every household by improving your bedroom style, putting in some contemporary woodwork, or introducing a completely eclectic decor theme throughout the house.
Renovating a house is a good expense that gives you satisfaction over a long period. A lot of renovations take place around important family functions, festivals, or celebrations. Also, when you have bought a new home or are looking to renovate the existing one. You don’t want to exhaust your savings. Therefore, the best way is to use a personal loan for home renovation for all these purposes.
A personal loan is an unsecured loan that means you don’t have to put a security against the approved loan, which is the most attractive feature of a personal loan. This makes personal loans convenient for those who are just starting a career and do not have assets to put up as collateral.
These are some points to renovate your home using a personal loan:
A Complete Plan Is Necessary
Whenever you do some work, you have to make a complete plan in renovating your home where many expenses occur. In the same way, when you are renovating your home, you should draw up a complete plan before starting your project. Poor planning and execution waste money and valuable resources. Like the home décor, which costs a lot, you have to plan in such a way that it is under your budget. You should make a list of what is necessary and important to you according to their cost. This will make your project easier to understand, and it is a good idea to allow for unexpected expenses.
Stick To A Budget
This is the next most important thing that everyone should follow. Whenever you spend money, it’s a good idea to know how much we are saving from that purchase, whether it’s simply a meal out or buying something big. Most people don’t think about all the small monthly bills or buy unnecessary things that are not required. When we are planning for a personal loan for home renovation, you should be careful to spend money and tighten your monthly budget. You should stick to a planned budget, which will help you in the monthly EMI of the personal loan.
Compare The Price And Offers
Comparing prices is essential before purchasing because it will help you to find great deals on the same item or similar items at discounted prices. In today’s world, everything is dependent on technology. All the information you want is readily available at your fingertips. This makes our life very easier. Instead of going to shops, you can survey the best prices, offers, and reviews online in all categories before making a purchase that comes under your budget, and you can get everything you need.
Personal Loan EMI calculator is Useful
If you take a personal loan, you need to pay the principal and the interest amount. If you are planning for a personal loan, you should use an Equated Monthly Installment (EMI) calculator to estimate the monthly installment payments. According to the plan you have prepared, you have a good idea of the loan you need. The lender determines the interest rate for a personal loan. The EMI consists of the principal amount of the loan and the interest paid on the personal loan.
After that, only the loan tenure remains, which is the period or duration for which the loan amount is sanctioned. You can adjust the tenure of the loan on the calculator. Personal loans, car loans, education loans have shorter tenures as compared to home loans.
Apply for the Personal Loan
Before you go ahead with your personal loan requirements, ensure to check your eligibility first. For applying for a personal loan, you must be a resident of that country, and you have to be between 21 and 60 years of age with a net monthly income of over Rs 30,000. With a good credit score, the probability of your personal loan for renovating a home is higher. These are some steps that need to follow for applying for a personal loan:
1. Fill Out the Application Form.
First of all, you have to fill the application form. Ensure that you provide accurate personal, employment, and financial details. You will also have to fill in your PAN and Aadhar number to proceed to the next step.
- Select the loan amount
- Submit Required Documents like KYC documents (ID and address proofs), Salary slips, bank statements (past 3 months), employee ID, or business proof
- And at last, receive Your Loan Amount
Conclusion
After the above points, we get to know how to renovate your home using a personal loan. A personal loan is very useful for its no collateral, instant approval, cheaper than a credit card, no prepayment penalty after six months, long tenure, etc.
Also Read: WPIT18.com Login
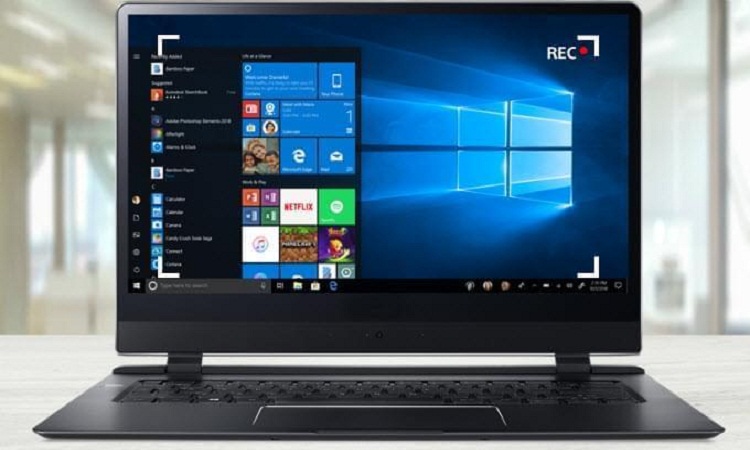
Many times we want to screen record on our laptop but we have no knowledge of how to do it. In this article, we will educate you about the simple steps or even the best screen recorders for Windows 10 you can use to screen record on a Laptop.
So let’s get started:
First, we will be covering the manual processes of how to do screen recording on a laptop and then we may also discuss some of the best screen recording software for Windows.
Let’s cover them one by one.
1. Use Game Bar To Record Your Laptop Screen:
Before covering the steps of how to do it, please note the Game Bar option can only be used if you have Windows 10. If you have a previous version of the Windows Operating System, the Game Bar option won’t work. This option though is very easy and comes with a limitation. With Game Bar, you can record the laptop screen of only one program at a time. It cannot be used to record screens with multiple programs. Let’s see how to do screen recording on a laptop using the Game Bar:
- Launch the program or app which you want to record.
- Press the Windows Logo Key and G simultaneously on your Keyboard.
- Doing so will open a dialogue box asking you to open the Game Bar. Choose Yes, this is a game.
- On the Game Bar, click on the Mic icon to screen record with audio.
- Once done, click on the Record button to start the screen recording.
- When you want to finish recording, simply click on the Stop button.
- Post this press Windows Logo Key and E simultaneously to open the File Explorer.
- Copy the address from the Address bar and then press the Enter key.
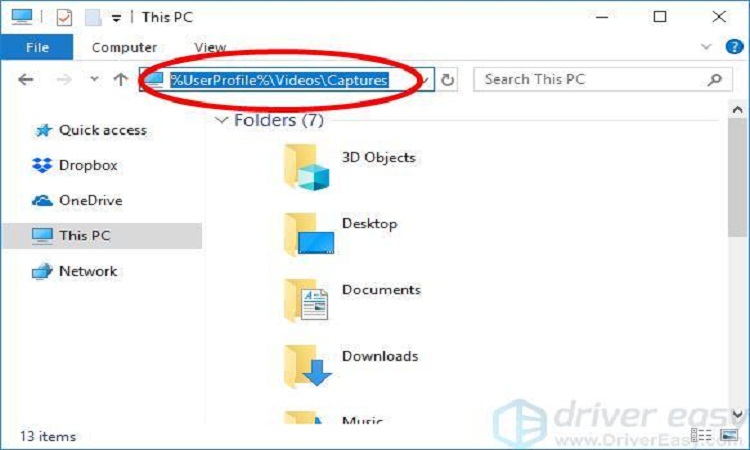
This is how you can record a laptop screen easily using the Game Bar in Windows 10. However, if you do not have Windows 10, and still want to learn how to do screen recording on a laptop, you can also use third-party tools to accomplish the task for you. Let’s see some of the apps to do screen recording on a laptop.
1. ActivePresenter:
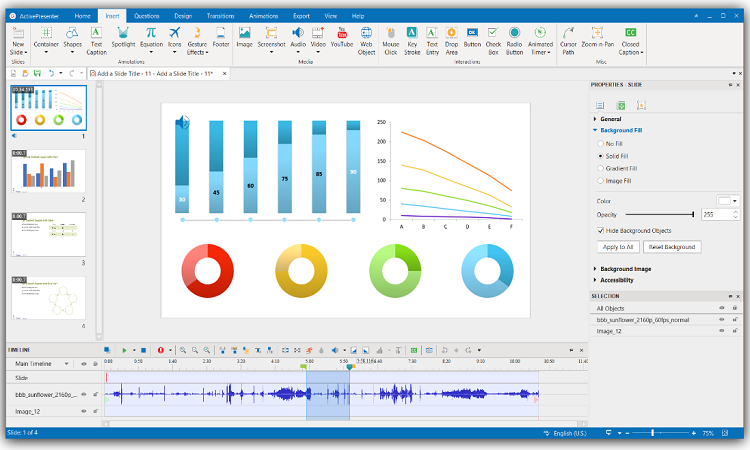
ActivePresenter is a third-party screen recorder tool by Atomi Systems that not only records screens but can also be used to edit videos. ActivePresenter is one of the most popular tools to screen record on a laptop and is used by YouTubers, trainers, Faculties, video creators, etc.
ActivePresenter comes in both free and paid versions. The free version itself delivers most of the functionalities and users may want. It lets you capture the screen, trim it, cut, split, make changes in the speed and volume, add animation, etc. Another advantage of the trial version is that it does not add a watermark even in the trial version.
The paid version on the other hand has more advanced features of editing audio and video and also provides software simulations.
Benefits Of Using ActivePresenter:
- Easily lets you record full screen, a window, region.
- Comes with a video editor that lets you edit captured videos as well as imported videos.
- The free version provides all the basic features like cut, trim, adjust, transitions, animations, change speed and volumes, etc.
- It is ad-free and you can record a laptop screen without any time limit.
- The paid version contains advanced features like the Blur effect, noise reduction, audio fade in/out, etc.
While there are so many benefits of using ActivePresenter to screen records on a laptop screen, it also has some limitations.
- It is available for only 64-bit Operating Systems.
- You cannot schedule screen recording.
- Video cropping features are still missing.
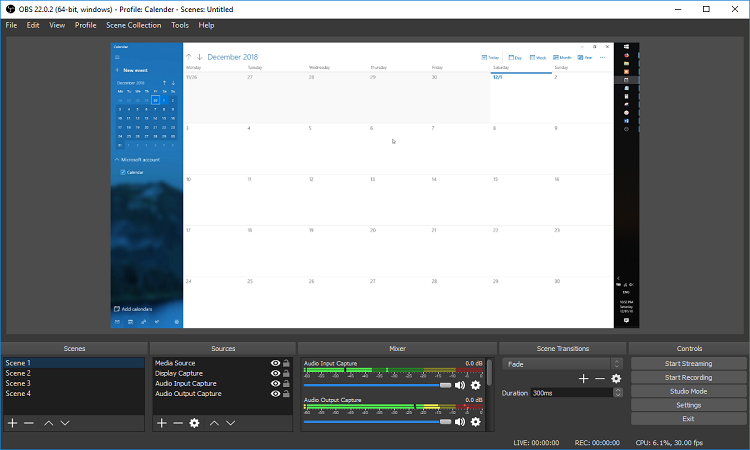
2. OBS Studio:
OBS Studio is another screen recording software that can be beneficial when you are learning how to do screen recording on a laptop. With OBS Studio one can easily screen record, do video recording, and also live stream videos without any watermark and there is no time limit on the duration of the screen recording.
Due to these benefits of OBS Studio software, it is highly recommended for gamers who like to broadcast their gameplay. OBS Studio allows users to capture the entire laptop display as well as capture screen using a webcam or even a microphone which is an amazing feature. It also helps in creating layered videos for webcams and lets the user select the desktop applications as well as the audio sources that they might want to share.
However, OBS Studio does not have a video editor which is still a missing functionality many users look for in a screen recorder application.
Benefits Of Using OBS Studio:
- Easily lets you record a full screen, microphone, web cam, window, etc.
- It is totally free from any kind of ads.
- Allows streaming to YouTube, DailyMotion, etc.
- It does not contain any watermark.
- Contains all features like cut, trim, adjust, transitions, animations, change speed and volumes, etc.
- Comes with an easy-to-use audio mixer.
While there are so many benefits of using OBS Studio to screen records on a laptop screen, it also has some limitations.
- It does not have a video editor.
- There is no Pause button for recording.
We all might want to record a laptop screen under situations where we might save our work or may need it at a later stage. While you can always take screenshots or write down the steps of the important work, it is always recommended you record the entire screen so that you have it all in one place.
Screen Recorders are also used by gamers to record screens as well as for live streaming. If you have Windows 10 you can easily use the Game Bar option to do screen recording on a laptop. However, since it is only present in Windows 10, others that may have previous versions of Windows can make use of the screen recording tools mentioned above and easily learn how to do screen recording on a laptop.

How to Make the Perfect Espresso at Home

Usatoday.com: Angel Number 111 Meaning

Digitalconnectmag.com: Putlocker Review & Alternatives in 2023

How Social Media Marketing Helps To Build Strategy?

Four Pillars to a Highly-Performing DevOps Strategy to Speed up Business Results

Where to Buy Platypus Shoes

What’s Next For Liquorland?

What to Expect at Oak Grove Casino

Indigo Sky Casino & Resort Review

Salicylic Acid Face Wash

How to Turn Off Ad Personalization

The Best Fish and Chips Near Me

How to Find a Wilko Near Me

How to Find Canadian Tire Hours

Best Dog Parks in Buford, GA
-
 GAMING3 years ago
5 Coolest Patterns In Mirror Cube That You Should Know
-

 Reviews2 years ago
9xflix Com | 9xflix 2022 Bollywood Movies Download
-
 PC/TABLET/MOBILES4 years ago
Pc Builder: Find The Best Parts For Your Pc And Your Workstation
-
 GAMING3 years ago
11 Top Alternatives To Stream2watch For Live Streaming Sports
-
 TECH3 years ago
Complete Guide of 1337x Proxy 2021 | List of Unblocked 1337x Sites
-

 TECH3 years ago
What Are The Tricks To Resolve The Fritzbox 7590 Red Info Light?
-
 APPS AND SOFTWARE3 years ago
Build A White-Label On-Demand Service Marketplace In A Snap With The Thumbtack Clone
-
 PC/TABLET/MOBILES3 years ago
Top 7 Tech Products of the Decade That You Must Know